Apr 25, 2011

Summary of the project's Tools


Photoshop is a powerful program which can be used for editing, manipulating, enhancing and re-creating new pictures. In my project here it is used to re-create 5 pictures (which can be used as posters) that promote environmental issues, situations or goals. Each picture has a title reflecting an idea behind it. The following discussion will present and explain the tools used to recompose and create these five pictures.
The creation of all the five pictures involved using the selection tools; like rectangular marquee tool, elliptical marquee tool and magic wind tool; which allowed selecting certain parts from the original pictures and cut /paste them in the working window. Also, type tool  was used. The type tool allowed me to add text to the picture and to make it more appealing; a 3D effect has been added to it by using the duplicate option from the layer panel. The idea was to duplicate the text layer many times; and in each duplication the new duplicated text layer was moved slightly to the right.
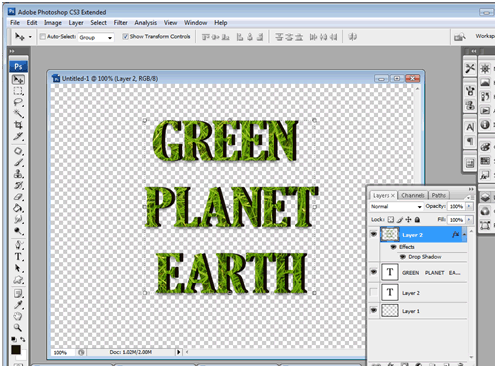
In addition, the merge option form the layer panel was used when it was necessary to work with many layers as one layer. Moreover, Photoshop provides the option "create clipping mask", which I utilized to integrate two layers inside each other. It was used in the picture titled" Green Environment" by making the grass layer gets inside the text layer (refer to the first picture) and also in the picture titled "Survivors" by making a cracked ground picture to be inside the text that has been written the picture. And to add attractive effects to the layers, the "layer style" option was employed; such as (drop shadow, Inner shadow gradient overlay and others). They were used in almost all the pictures. Also, blending mode like overlay, lighten, soft light and others were utilized in blending layers; for example, the picture that is titled "The Future of Planet Earth" used the blending mode overlay to blend the water layer with the earth planet layer which gives the effect of having the water inside the planet. The picture "Light our earth with green environment" also used overlay to make the planet earth inside the lamp. Opacity and fill options were employed to produce reflection effects like in the picture titled "Survivors". Layer adjustment options like hue and saturation were exploited to change colors of the layers. The flame color in the picture "Global Warming" was made using hue and saturation. The gray color of the planet in the picture "The Future of planet Earth" was added using hue and saturation. Photoshop filters were utilized and that can be seen in the picture "Global Warming"; the flame that is coming out of the text was made from Stylize and wind. And to make the flame larger; the option liquefy from filter menu allowed that. Lens flare is a filter is applied on the picture "The Future of planet Earth"; which is found within the option render. Finally, transform options from edit menu were used to change size of the window content, flipping, rotation skew and others. The text in the picture "Green Environment" is made flat by using the skew option. Also the text in the picture "Global Warming" made surrounding the planet by using warp command from transform option.
To sum up , there are many tools in photoshop that could be used for different creative purposes.These five pictures in my project show examples of how photoshop capabilities and tools can be utilize to enhance, manuipulate, change images, recompose and recreate pictures for any desired purpose.

Apr 13, 2011

Fifth picture for the project


Title: Global Warming.
Idea: Planet earth is getting heat up and surrounded with the fire (warming).
Original pictures:

  Final product:

 Idea: Planet earth is getting heat up and surrounded with the fire (warming).
 Global warming is one of the environment issues nowadays. The picture is aiming to warn people about global warming by having the word warming flaming around the globe and heating the earth up. Instead of having the sun or other cause around it. It was  thought that the word warming will catch the eye and send a clear message.


Steps:

1- Create new window and open all the needed pictures
2- Using the elliptical marquee tool, select the globe and drag it to the new window
3- Use Hue/Saturation to add heat effect by changing the slider of the colors.
4- Type the text and make it big.
5- Rotate the text 90 CW
6- Add filter effect Stylize -> wind , twice .
7- Return the position of the text as it was written before.
8- Use liquefy option from filter menu to make the flames larger.
9- To create flames color effect; use the Hue/Saturation option on the text
10- Add layer styles (Gradient overlay ) to the text using the colors , dark brown- black and orange
11- From edit menu choose transform option ->Warp option for the text and drag it from different angles to make the text surrounding the globe. 
12- For the globe shadow; draw a colored circle and change the percentage of the opacity and fill . Finally place the layer under the globe and text layer.

Fourth Picture for the project


Title: The Future of planet Earth.
Idea: The planet earth will run out of water due to the excessive usage
Original pictures:


 Final product:

 Idea: The planet earth will run out of water due to the excessive usage.

 Another environment issues is excessive use of water. The  Picture presents  the excessive use of water by a tap that is opened to the extreme (as a message of using a lot of water ). this will cause  the water on the planet earth with finish. And if people did not do something about, we will have problem in the future.


Steps
1- Create new window filled with a black background by using paint bucket tool.
2- Use the selection tools like (rectangular marquee tool, elliptical marquee tool and magic wind tool or any appropriate selection tool). Cut the parts from the original pictures and put them in the new window.
3- To make water inside the globe picture, cut some part of the water's picture and put it above the globe then apply the blending option (overlay).
4- To give light effect from filter menu select render option then lens flare option
5- Type the text and add layer style to it to make it appealing like ( drop shadow , bevel and emboss, gradient overlay and satin)

Third Picture for the Project


Picture Title: Light our earth with green environment.
Idea: Light up the bulb using green planet .
Original pictures:

  Final product:


 Idea: Light up the bulb using green planet
 Green environment is one of the ways that is considered a good solution for our environment. The bulb  picture is  a representation of an "idea" that we should have. For that the picture got a bulb that light up the planet with green light. The purpose of that is  sending a message, motivation, idea of start thinking green environment .


Steps
1- Create new window with any size you want.
2- Select the gradient tool and select the color you want to be mixed together. Then apply the tool on the window.
3- Drag the lamp and globe picture to the working window and make sure that the globe layer is above the lamp layer.
4- Apply blending mode (overlay) to the globe layer so that it looks inside the lamp.
5- Rotate the lamp from edit menu and transform option.
6- Type the text using the typing tool, then add layer styles for example ( stroke – shadow)
7- To make rays effect, use the Custom Shape Tool and choose a shape that represents the rays coming out; choose color for it and reduce the opacity of the layer.

Second Picture for the project


Picture Title: Survivors
Idea: Some animals tried to survive the result of global warming.
Original pictures:


Final product:

 Idea: Some animals tried to survive the result of global warming.
 Global warming is causing melting of ice in the Arctic and Antarctic. So the picture represent a vision of Some animals tried to survive the result of the melting and throwing a man (human being) out of the stone text since we ( human being ) are the one who caused that.


Steps:

1- Create new window and open all the needed pictures.
2- Cut the picture of the sea to the new window.
3- Type the text using the typing tool and make it bigger.
4- Duplicate the text layer as many as you want. After each duplication move the new duplicated layer slightly to the right, this will give the text 3D effect.
5- Merge all the duplicate text layers, excluding the original text layer.
6- Cut the cracked ground from the original picture, paste it in the new window and make sure that the layer of the cracked ground is above the first text layer.
7- Right click on the cracked ground and choose "create clipping mask" option, this will allow the picture to be inside the text.
8- Merge the text layer with the cracked ground layer.
9- Cut some grass and animals using rectangular marquee tool, elliptical marquee tool and magic wind tool or any appropriate selection tool and paste it in different places in the text.
10- To make the text drown, put it on top of the sea layer and apply (overlay) blending mode
11- To make reflection of the animals, duplicate the picture of the animal and put them above the sea and reduce the opacity percentage. 
 Done :)

Mar 15, 2011

First picture for the project


Picture title :Green Environment.
Idea:some animals gathered together and state their opinion for conserving the enviroment by sculpturing  the ground
Original pictures:


Final product:

Idea: some animals gathered together and state their opinion for conserving the enviroment by sculpturing  the ground

 The picture represent a vision some animals gathered together and state their opinion for conserving the environment by sculpturing  the ground. The idea of having animals to object is that because humans being don't listen to each other and what we do on the environment is effecting the other creatures like animals .


Steps:
  1. Create new file
  2. Open the grass picture
  3. Drag the grass picture to the new file,then name the layer "grass 1"
  4. Duplicate the grass picture and  name the layer "grass 2" ,hide the layer to be used later
  5. Write the sentence " green environment earth" and name the layer "text 1"
  6. Duplicate the layer and hide it to be used later and name the layer "text2"
  7. From the layer window  make sure that the "grass 1" layer is above the "text1 "layer
  8. Right click on the "grass 1" layer and choose "create clipping mask", so that the grass go inside the text.
  9. Merge the two layers 
  10. Add some layer styles.
  11. Unhide the "text2"  layer and make sure it is under " text1 " and move it a little bit to the right side so it gives 3d dimension.
  12. Merge the grass text with "text 2" layer  .
  13. Use Transform à skew and Distort to give the effect that the text has been written on the ground.
  14. Create a new layer and draw a circle with brown color.
  15. Select the circle with the Elliptical Marquee Tool.
  16. From menu select inverse
  17. Then from select menu  go to Modify then  feather and insert 20  then press  delete
  18. Change the percentage of the Fill to be 70 from the layer window
  19. Unhide the "grass 2" layer, put it under the brown circle layer and apply Transform à skew and Distort to  it .
  20. Open the picture with river  and sky  , cut them and put them in the grass and text window.
  21. Cut the animals pictures and put them in the working window – to isolate the background of the animals pictures, use the magic wand selection and select the background and press delete . Then drag the animals' pictures to the working window.
  22. Create new layer and draw a rectangle using  Rectangular Marquee tool  , color it and put it under the Falcon – apply some layer style and write the text "No Environment
  23. Degradation".


DONE  :)

Mar 9, 2011

Name of the pictures

1- Light our earth with green environment.
2-The Future of planet Earth.
3-Global Warming.
4-Survivors.
5-Green Environment.